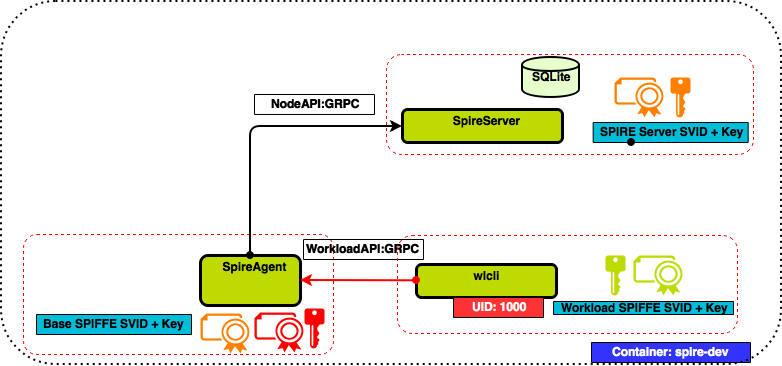
Quickstart for Docker Compose
Quickly get SPIRE up and running on Docker Compose
This walkthrough will guide you through the steps needed to setup a running example of a SPIRE Server and SPIRE Agent. Interaction with the Workload API will be simulated via a command line tool.

Requirement(s)
Git Setup
Clone the SPIRE github repo.
git clone https://github.com/spiffe/spire
Docker Setup
If you don’t already have Docker installed, please follow these installation instructions.
Terminology
| Term | Description |
|---|---|
| spire-server | SPIRE Server executable |
| spire-agent | SPIRE Agent executable |
| socketPath | Unix Domain Socket file path through which workloads connect to Workload API |
| Join Token | Nonce generated by the SPIRE Server to attest SPIRE Agents |
| selector | A native property of a node or workload |
Walkthrough
-
Build the development Docker image.
make dev-image -
Run a shell in the development Docker container.
make dev-shell -
Create a user with uid 1000. The uid will be registered as a selector of the workload’s SPIFFE ID. During kernel based attestation the workload process will be interrogated for the registered uid.
useradd -u 1000 workload -
Build SPIRE by running the build target. The build target builds all the SPIRE binaries.
make build -
Try running
helpforentrysub command. The spire-server and spire-agent executables have-—helpoption that give details of respective cli options../bin/spire-server entry --help -
View the SPIRE Server configuration file.
cat conf/server/server.confThe default SPIRE Server configurations are shown below. A detailed description of each of the SPIRE Server configuration options is in the Server documentation.
server { bind_address = "127.0.0.1" bind_port = "8081" trust_domain = "example.org" data_dir = "./.data" log_level = "DEBUG" default_svid_ttl = "1h" ca_subject { country = ["US"] organization = ["SPIFFE"] common_name = "" } } plugins { DataStore "sql" { plugin_data { database_type = "sqlite3" connection_string = "./.data/datastore.sqlite3" } } NodeAttestor "join_token" { plugin_data { } } KeyManager "memory" { plugin_data = {} } UpstreamAuthority "disk" { plugin_data { key_file_path = "./conf/server/dummy_upstream_ca.key" cert_file_path = "./conf/server/dummy_upstream_ca.crt" } } } -
Start the SPIRE Server as a background process by running the following command.
./bin/spire-server run & -
Generate a one time Join Token via spire-server token generate sub command. Use the -spiffeID option to associate the Join Token with spiffe://example.org/host SPIFFE ID. Save the generated join token in your copy buffer.
./bin/spire-server token generate -spiffeID spiffe://example.org/hostThe Join Token will be used as a form of node attestation and the associated SPIFFE ID will be assigned to the node.
The default ttl of the Join Token is 600 seconds. We can overwrite the default value through -ttl option.
-
View the configuration file of the SPIRE Agent
cat conf/agent/agent.confThe default SPIRE Agent configurations are shown below. A detailed description of each of the SPIRE Agent configuration options is in the Agent documentation.
agent { data_dir = "./.data" log_level = "DEBUG" server_address = "127.0.0.1" server_port = "8081" socket_path ="/tmp/spire-agent/public/api.sock" trust_bundle_path = "./conf/agent/dummy_root_ca.crt" trust_domain = "example.org" } plugins { NodeAttestor "join_token" { plugin_data { } } KeyManager "disk" { plugin_data { directory = "./.data" } } WorkloadAttestor "k8s" { plugin_data { kubelet_read_only_port = "10255" } } WorkloadAttestor "unix" { plugin_data { } } WorkloadAttestor "docker" { plugin_data { } } } -
Start the SPIRE Agent as a background process. Replace with the saved value from step #8 in the following command.
./bin/spire-agent run -joinToken <generated-join-token> & -
The next step is to register a SPIFFE ID with a set of selectors. For the example we will use unix kernel selectors that will be mapped to a target SPIFFE ID.
./bin/spire-server entry create \
    -parentID spiffe://example.org/host \
    -spiffeID spiffe://example.org/workload \
    -selector unix:uid:1000
At this point, the target workload has been registered with the SPIRE Server. We can now call the Workload API using a command line program to request the workload SVID from the SPIRE Agent.
-
Simulate the Workload API interaction and retrieve the workload SVID bundle by running the
apisubcommand in the agent. Run the command as user workload created in step #3 with uid 1000su -c "./bin/spire-agent api fetch x509 " workload -
Examine the output. Optionally, you may write the SVID and key to disk with
-writein order to examine them in detail.su -c "./bin/spire-agent api fetch x509 -write ./" workload openssl x509 -in ./svid.0.pem -text -noout